Creating an OpenCart 2.x extension is a fairly simple process and there are many different resources available out there to help you with this.
Today I would like to share the MultiMerch way of doing this. This is how we create our OpenCart extensions and MultiMerch addons.
This is the first part of the tutorial – I'll try to make it as simple and easy to understand as possible.
Displaying a custom page in OpenCart is fairly easy, but in most cases you'll need more than that. We usually need our OpenCart extensions to have at least the following parts (in addition to the main logic):
- a simple way to install and remove them
- configuration/settings (and a simple interface to change them)
- database tables to store and retrieve data (and a way to create and delete them without asking the user to run SQL scripts manually)
- support for multiple languages (OpenCart has quite a multilingual user base)
Let's create a simple extension skeleton that will allow us to do all of this. Today we'll cover the admin-area part of the extension without settings (I'll talk about them in Part 2).
You most likely already know that OpenCart is based on a fairly straight forward MVC architecture plus a set of language files. The Models store the database procedures, the Views hold the HTML code of pages and Controllers fetch the data using Models and use it to render Views.
In addition to this, OpenCart's main code is split in two separate parts (admin/ and catalog/, each containing an MVC structure) along with common files and libraries under system/.
Today, we only need the admin/ part. OpenCart usually stores its extension files under the module/ subfolder inside each of the MVCL folders. Let's stick to this and create the following folder structure in our workspace:
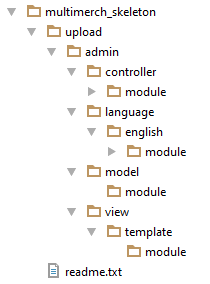
Great! This structure will hold our models, views, controllers and languages.
Note that we've placed our structure inside a separate upload/ folder with a readme.txt file outside of it. This isn't mandatory, but it makes it easy to separate what needs to be uploaded to OpenCart installation from everything else.
Now let's start adding files.
Most users expect the newly uploaded extensions to appear under Admin > Extensions > Modules. OpenCart will display our new extension on this page automatically, but it needs two files to be able to do it: language file (to display the title) and controller file.
Let's start with the language file.
Create a new file called multimerch_skeleton.php under admin/language/english/module/ and add the following code to it:
<?php

$_['heading_title'] = 'MultiMerch Skeleton';

?>
Now create a file named multimerch_skeleton.php under admin/controller/module/ consisting of this empty class:
<?php

class ControllerModuleMultimerchSkeleton extends Controller {
}

?>
Make sure that file names and class names match. OpenCart uses this to determine what to load and where to find it.
You can now upload the contents of the upload/ folder (not the folder itself!) over to your OpenCart setup root and look into Admin > Extensions > Modules:
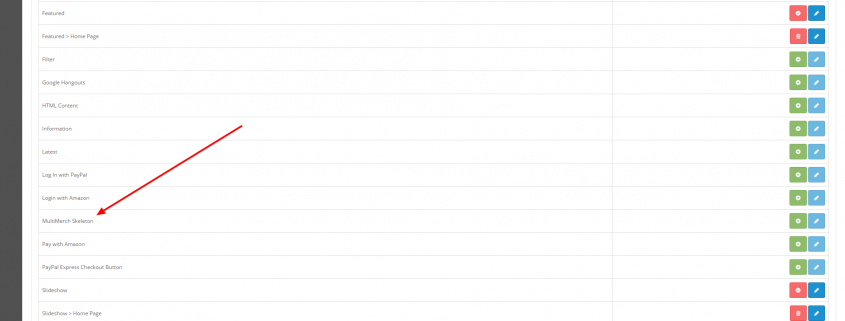
Neat, our Skeleton is there! It doesn't do much more than that, but it's already visible in the admin area and can be installed and uninstalled through OpenCart's own system.
Now, what if we also need a table in the database for our extension? Let's make OpenCart helps us do it!
First, we need the following multimerch_skeleton.php model file inside admin/model/module/:
<?php

class ModelModuleMultimerchSkeleton extends Model {
   public function createSchema() {
      $this->db->query("
      CREATE TABLE IF NOT EXISTS `" . DB_PREFIX . "multimerch_skeleton` (
      `field` VARCHAR(255) DEFAULT NULL
      ) DEFAULT CHARSET=utf8");
   }

   public function deleteSchema() {
      $this->db->query("DROP TABLE IF EXISTS `" . DB_PREFIX . "multimerch_skeleton`");
   }
}

?>
Here we have a simple database table with a single field that we want created and removed when Skeleton is installed/uninstalled. The DB_PREFIX constant holds the table prefix that was selected during OpenCart installation. Don't forget it when working with the database!
Now we need to tell OpenCart to call these functions. Let's add the following code to the multimerch_skeleton.php controller file inside our ControllerModuleMultimerchSkeleton class:
<?php

class ControllerModuleMultimerchSkeleton extends Controller {
   public function install() {
      $this->load->model("module/multimerch_skeleton");
      $this->model_module_multimerch_skeleton->createSchema();
   }

   public function uninstall() {
      $this->load->model("module/multimerch_skeleton");
      $this->model_module_multimerch_skeleton->deleteSchema();
   }
}

?>
These two controller functions are called by OpenCart automatically when you install and uninstall the module through Admin > Extensions > Modules.
Now we can upload our files and test them out!
Let's try installing MultiMerch Skeleton via Admin > Extensions > Modules to see what happens.
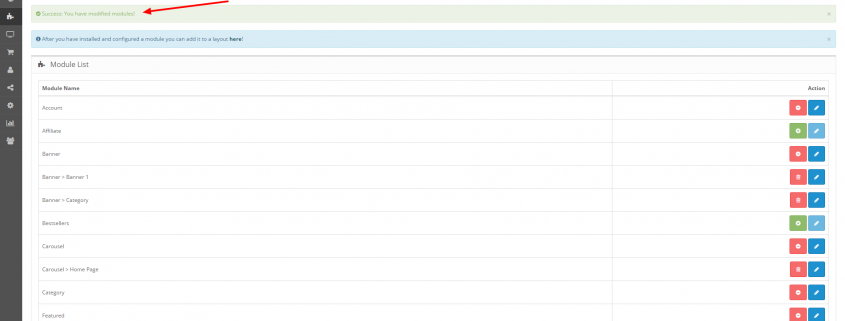

Awesome! Now our Skeleton extension is installed and the table is there. It will be removed if Skeleton is uninstalled via Admin > Extensions > Modules.
That's it for today, hopefully this helped you learn something new about OpenCart extensions. In Part 2, we'll cover configuration, settings page and a few other important things.
Meanwhile, let me know in the comments if I've forgotten something or if you have any questions!
The post How To Create An OpenCart Extension: Part 1 appeared first on MultiMerch Marketplace.